ARTICLE · 1279452
第 4.3 章:十万份文档,怎么批量 Embedding?

《RAG 实战案例》第 4.3 节。
将完整文档库拆成多个百炼 Batch 任务,逐片生成并写入向量,通过版本 Collection 和 Alias 安全切换 Milvus 索引。
本章篇幅较长,我花了几天时间才完成。相信认真读完后,你会有所收获。十万级文档的批量 Embedding 在市面上几乎没有相关教程,这也正是实战的价值所在。
本节目标
上一节用 20 份文档验证了索引链路,但处理完整文档库时触发了 Throttling.AllocationQuota。原因是同步接口一分钟内接收了太多 Token。
简单加个 sleep() 虽然能暂时绕开限流,但全量任务仍然缺少进度记录和失败恢复。把全部数据放进一个 Batch 文件也不够稳妥:文档库继续扩大后,文件会超过平台限制,任何一次失败都要重新处理整批数据。
全量索引不要求立即返回结果,更适合使用异步 Batch API。
百炼官方也建议大规模、非实时的向量化使用 Batch API。它由平台异步调度,不占用同步接口的在线 TPM,费用只有实时调用的一半。具体规则见百炼批量推理(https://help.aliyun.com/zh/model-studio/batch-inference)。
改用 Batch 构建全量索引
上一节的 rag index build 用来验证小规模文档的索引链路。从本节起删除这个命令,完整文档库的首次构建和重建统一使用 Batch API。
新增或修改文档后,先执行 rag ingest 更新 PostgreSQL,再通过 Batch 重新构建完整索引。只处理变化文档的增量索引会在后续章节实现。
embeddings.py 中的同步 Embedding 接口仍然保留,下一节要用它生成用户问题的向量。
整体流程
内容比较多,且复杂,我做了一个视频,给大家理顺其中的逻辑:
安装 OpenAI SDK
百炼 Batch API 通过 OpenAI 兼容接口提交任务,所以需要在项目根目录安装 OpenAI SDK:
uv add openai项目会同时使用两个 SDK:全量索引通过 openai 提交 Batch 任务,用户问题的向量通过 dashscope 同步生成。
增加 Batch API 地址
在阿里云百炼业务空间页面复制同一业务空间的 OpenAI 兼容地址。它以 /compatible-mode/v1 结尾,与上一节使用的 /api/v1 地址不同。
在 .env 和 .env.example 中增加:
RAG_DASHSCOPE_COMPATIBLE_BASE_URL=替换成同一业务空间的_OpenAI_兼容地址修改 src/enterprise_rag_cli/config.py:
dashscope_compatible_base_url: AnyHttpUrl# 全量索引按页读取文档,避免一次加载整个文档库。full_index_document_page_size: int = Field(default=500, ge=1)# 单个分片主动低于百炼的 50,000 条请求和 500 MB 上限。batch_shard_max_requests: int = Field(default=5000, ge=1, le=50_000)batch_shard_max_bytes: int = Field( default=400_000_000, ge=1, le=500_000_000,)# 从结果文件读取向量后,按较小批次写入 Milvus。milvus_write_batch_size: int = Field(default=500, ge=1)API Key、DashScope 地址和 OpenAI 兼容地址必须来自同一个业务空间和地域。
分页读取文档
全量索引首先要避免把全部文档加载进内存。修改 document_repository.py,增加文档数量统计和流式读取函数:
from collections.abc import Iterator# 统计 parsed 的文档数量def count_parsed_documents(session: Session) -> int: statement = ( select(func.count()) .select_from(DocumentRecord) .where( DocumentRecord.status == "parsed", DocumentRecord.text.is_not(None), ) ) return session.scalar(statement) or 0# 分批从数据库中读取文档(大量数据时使用)def iter_parsed_documents( session: Session, page_size: int,) -> Iterator[Document]: statement = ( select(DocumentRecord) .where( DocumentRecord.status == "parsed", DocumentRecord.text.is_not(None), ) .order_by(DocumentRecord.document_id) .execution_options(yield_per=page_size) ) for record in session.scalars(statement): yield Document( document_id=record.document_id, source_type=record.source_type, source_id=record.source_id, title=record.title, text=record.text, content_sha256=record.content_sha256, )yield_per 让 SQLAlchemy 分批取得查询结果。程序仍然会遍历完整文档库,但内存中只保留当前正在处理的一页文档。
生成批量请求分片
Batch API 不会像同步接口一样立即返回向量。程序先把 Chunk 写成请求文件,再把每个文件作为独立任务交给平台:
1. 按 embedding_batch_size把 Chunk 分组,每条请求最多包含 20 个 Chunk。2. 连续写入当前 JSONL;达到请求数或文件大小上限时,关闭当前分片并创建下一个分片。 3. 为每个分片单独保存 requests.jsonl和chunks.jsonl。4. 每个分片独立提交、查询、重试和应用,某个分片失败时不用重做其他分片。
创建 src/enterprise_rag_cli/infrastructure/batch_embeddings.py:
from __future__ import annotationsimport jsonfrom collections.abc import Iterable, Iteratorfrom dataclasses import dataclassfrom pathlib import Pathfrom typing import TextIOfrom openai import OpenAIfrom enterprise_rag_cli.config import Settingsfrom enterprise_rag_cli.domain.models import Chunk@dataclass(frozen=True, slots=True)class PreparedShard: shard_id: str requests: int chunks: int request_bytes: int# 创建 OpenAIdef create_batch_client(settings: Settings) -> OpenAI: if settings.dashscope_api_key is None: raise RuntimeError("请先配置 RAG_DASHSCOPE_API_KEY") return OpenAI( api_key=settings.dashscope_api_key.get_secret_value(), base_url=str(settings.dashscope_compatible_base_url).rstrip("/"), )# 创建任务分片,把 Chunk 分成多个分片def write_batch_shards( chunks: Iterable[Chunk], shards_dir: Path, settings: Settings,) -> list[PreparedShard]: shards_dir.mkdir(parents=True, exist_ok=True) prepared: list[PreparedShard] = [] pending: list[Chunk] = [] shard_index = 0 request_file: TextIO | None = None chunk_file: TextIO | None = None request_count = 0 chunk_count = 0 request_bytes = 0 # 创建一个新的分片目录,打开两个 JSONL 文件,并重置计数器 def open_shard() -> None: # 声明外部变量 nonlocal request_file, chunk_file nonlocal request_count, chunk_count, request_bytes # 将整数格式化为至少 4 位,不足的部分在左侧补零 shard_id = f"{shard_index:04d}" shard_dir = shards_dir / shard_id shard_dir.mkdir() request_file = (shard_dir / "requests.jsonl").open( "w", encoding="utf-8", ) chunk_file = (shard_dir / "chunks.jsonl").open( "w", encoding="utf-8", ) request_count = 0 chunk_count = 0 request_bytes = 0 # 关闭当前分片的文件,记录分片统计信息,并清空文件句柄 def close_shard() -> None: nonlocal request_file, chunk_file if request_file is None or chunk_file is None: return request_file.close() chunk_file.close() prepared.append( PreparedShard( shard_id=f"{shard_index:04d}", requests=request_count, chunks=chunk_count, request_bytes=request_bytes, ) ) request_file = None chunk_file = None # 生成一条 Batch 请求 def request_line(current: list[Chunk]) -> str: request = { # 记录这条请求在当前 chunks.jsonl 中的起始位置。 "custom_id": f"chunk-offset-{chunk_count:012d}", "method": "POST", "url": "/v1/embeddings", "body": { "model": settings.embedding_model, "input": [chunk.text for chunk in current], "encoding_format": "float", "dimensions": settings.embedding_dimensions, }, } return json.dumps(request, ensure_ascii=False) + "\n" # 生成分片 def write_request(current: list[Chunk]) -> None: nonlocal shard_index, request_count, chunk_count, request_bytes if request_file is None: open_shard() line = request_line(current) line_bytes = len(line.encode("utf-8")) if line_bytes > 1_000_000: raise ValueError("单条 Batch 请求超过 1 MB") # 当前分片已经有请求,并且请求数量达到上限,或者加入新请求后文件大小会超出上限,就切换到下一个分片 should_rotate = request_count > 0 and ( request_count >= settings.batch_shard_max_requests or request_bytes + line_bytes > settings.batch_shard_max_bytes ) if should_rotate: close_shard() shard_index += 1 open_shard() line = request_line(current) line_bytes = len(line.encode("utf-8")) if request_file is None or chunk_file is None: raise RuntimeError("分片文件尚未打开,无法写入请求") request_file.write(line) for chunk in current: chunk_file.write(chunk.model_dump_json() + "\n") request_count += 1 chunk_count += len(current) request_bytes += line_bytes # 批量处理 for chunk in chunks: pending.append(chunk) # 达到批量处理的数量,开始批量处理 if len(pending) == settings.embedding_batch_size: write_request(pending) pending = [] # 处理剩余的 if pending: write_request(pending) close_shard() if not prepared: raise ValueError("没有可以生成向量的 Chunk") return preparedcustom_id 保存的不是全局序号,而是当前请求对应的第一个 Chunk 在分片中的位置。结果文件顺序被打乱后,程序仍然能找到正确的 Chunk。
百炼单个 Batch 文件最多包含 50,000 条请求且不能超过 500 MB。这里同时检查两项限制,并主动使用更小的默认值,为 JSON 编码差异和后续配置变化留出空间。
按照默认配置,一个分片最多包含 5,000 条请求,每条请求最多包含 20 个 Chunk,也就是最多处理约 10 万个 Chunk。5000 份文档可能生成一个或几个分片;以后扩展到 5 万、16 万或者更多文档时,只会继续增加分片数量,不会所有数据塞进同一个任务。
封装单个分片的提交与查询
继续在 batch_embeddings.py 中增加:
# 提交批量处理请求(一个分片一个分片提交)def submit_embedding_batch( client: OpenAI, input_path: Path, task_name: str,) -> str: with input_path.open("rb") as file: uploaded = client.files.create( file=file, purpose="batch", ) batch = client.batches.create( input_file_id=uploaded.id, endpoint="/v1/embeddings", completion_window="24h", metadata={ "ds_name": task_name, }, ) return batch.id# 获取批量请求的状态,状态依次是(validating、in_progress、finalizing 和 completed)def get_batch_status( client: OpenAI, batch_id: str,) -> str: return client.batches.retrieve(batch_id).status提交成功只表示平台已经接收了一个分片。每个分片都有自己的 batch_id,状态会依次经历 validating、in_progress、finalizing 和 completed。
准备全量索引任务清单
接下来把分页读取、文档切分和请求分片连起来,并用一个 manifest.json 记录整次全量索引。
创建 src/enterprise_rag_cli/application/batch_indexing.py:
from __future__ import annotationsimport jsonfrom dataclasses import dataclassfrom datetime import UTC, datetimefrom pathlib import Pathfrom uuid import uuid4from sqlalchemy.orm import Sessionfrom enterprise_rag_cli.application.chunking import ( create_chunker, split_document,)from enterprise_rag_cli.config import Settingsfrom enterprise_rag_cli.domain.models import Chunkfrom enterprise_rag_cli.infrastructure.batch_embeddings import ( write_batch_shards,)from enterprise_rag_cli.infrastructure.document_repository import ( count_parsed_documents, iter_parsed_documents,)@dataclass(frozen=True, slots=True)class FullIndexRun: run_id: str run_dir: Path documents: int chunks: int shards: int# manifest文件路径def _manifest_path(settings: Settings, run_id: str) -> Path: return settings.reports_dir / "index-jobs" / run_id / "manifest.json"# 读取manifest文件的内容def _load_manifest(settings: Settings, run_id: str) -> dict: path = _manifest_path(settings, run_id) if not path.exists(): raise ValueError(f"找不到全量索引任务:{run_id}") return json.loads(path.read_text(encoding="utf-8"))# 生成 manifest 文件def _save_manifest( settings: Settings, run_id: str, manifest: dict,) -> None: path = _manifest_path(settings, run_id) # 创建.tmp为后缀的临时文件 temp_path = path.with_suffix(".tmp") temp_path.write_text( json.dumps(manifest, ensure_ascii=False, indent=2), encoding="utf-8", ) # 替换原文件 temp_path.replace(path)# 读取文档,然后转换成 Chunk,再转成分片,并且使用 manifest 记录下任务def prepare_full_index( session: Session, settings: Settings,) -> FullIndexRun: document_count = count_parsed_documents(session) if document_count == 0: raise ValueError("PostgreSQL 中没有可以建立索引的文档") chunker = create_chunker( settings.chunk_size, settings.chunk_overlap, ) def chunks(): # 读取数据库中文档 documents = iter_parsed_documents( session, page_size=settings.full_index_document_page_size, ) # 分成Chunk for document in documents: yield from split_document(document, chunker) timestamp = datetime.now(UTC).strftime("%Y%m%d%H%M%S") run_id = f"{timestamp}-{uuid4().hex[:8]}" run_dir = settings.reports_dir / "index-jobs" / run_id run_dir.mkdir(parents=True) # 把 Chunk 拆分成多个分片 shards = write_batch_shards( chunks=chunks(), shards_dir=run_dir / "shards", settings=settings, ) chunk_count = sum(shard.chunks for shard in shards) collection_name = ( f"{settings.milvus_collection}_{run_id.replace('-', '_')}" ) manifest = { "run_id": run_id, "collection_name": collection_name, "documents": document_count, "chunks": chunk_count, "shards": [ { "shard_id": shard.shard_id, "requests": shard.requests, "chunks": shard.chunks, "request_bytes": shard.request_bytes, "batch_id": None, "status": "prepared", "applied": False, } for shard in shards ], } _save_manifest(settings, run_id, manifest) return FullIndexRun( run_id=run_id, run_dir=run_dir, documents=document_count, chunks=chunk_count, shards=len(shards), )本地任务目录变成下面的结构:
reports/index-jobs/<run_id>/├── manifest.json└── shards/ ├── 0000/ │ ├── requests.jsonl │ └── chunks.jsonl └── 0001/ ├── requests.jsonl └── chunks.jsonlmanifest.json 记录所有分片的 batch_id、状态和应用进度。程序关闭后再次启动,仍然可以从这个文件继续执行。
提交并查询所有分片
继续在 batch_indexing.py 中增加:
from enterprise_rag_cli.infrastructure.batch_embeddings import ( create_batch_client, get_batch_status, submit_embedding_batch,)# 提交批量 Embedding 处理,并记录在 manifestdef submit_batch_shards(settings: Settings, run_id: str) -> int: manifest = _load_manifest(settings, run_id) run_dir = _manifest_path(settings, run_id).parent client = create_batch_client(settings) submitted = 0 for shard in manifest["shards"]: # 已提交且仍在正常处理中,不重复创建任务。 if shard["batch_id"] is not None and shard["status"] not in { "failed", "expired", "cancelled", }: continue shard_id = shard["shard_id"] # 批量Embedding batch_id = submit_embedding_batch( client=client, input_path=( run_dir / "shards" / shard_id / "requests.jsonl" ), task_name=f"enterprise-rag-{run_id}-{shard_id}", ) shard["batch_id"] = batch_id shard["status"] = "submitted" _save_manifest(settings, run_id, manifest) submitted += 1 return submitted# 查看批量 Embedding 的状态,并记录在 manifestdef refresh_batch_status( settings: Settings, run_id: str,) -> dict[str, int]: manifest = _load_manifest(settings, run_id) client = create_batch_client(settings) counts: dict[str, int] = {} for shard in manifest["shards"]: batch_id = shard["batch_id"] if batch_id is None: status = "prepared" else: status = get_batch_status(client, batch_id) shard["status"] = status counts[status] = counts.get(status, 0) + 1 _save_manifest(settings, run_id, manifest) return countsbatch-submit 可以重复执行。已经提交的分片会被跳过;状态为 failed、expired 或 cancelled 的分片会生成新的 Batch 任务,其他已经完成的分片不受影响。
逐片下载并还原向量顺序
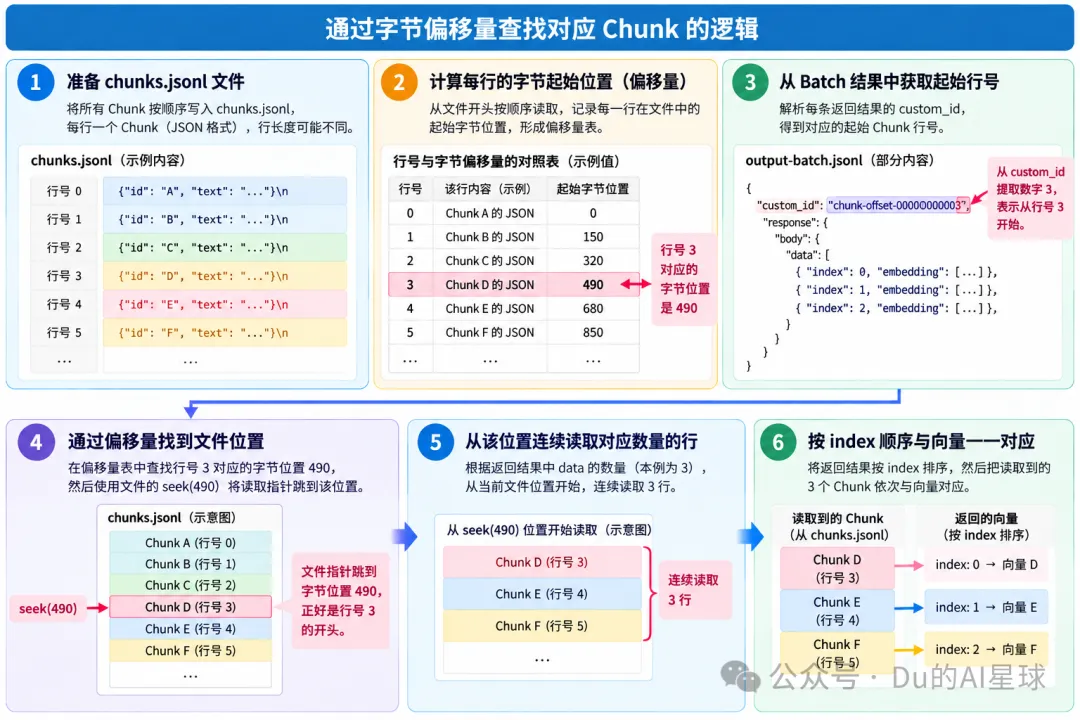
Batch 结果中的行顺序不保证与输入文件一致。custom_id 中保存了这条请求在当前 chunks.jsonl 中的起始位置,每条结果内部再通过 index 恢复顺序。
应用结果时也不能把整个分片的向量一次读进内存。下面的生成器每次只返回一条请求对应的 Chunk 和向量:
在 batch_embeddings.py 中增加:
# 下载Embedding 结果def download_batch_result( client: OpenAI, batch_id: str, output_path: Path,) -> None: batch = client.batches.retrieve(batch_id) if batch.status != "completed": raise RuntimeError(f"Batch 任务尚未完成:{batch.status}") if batch.output_file_id is None: raise RuntimeError("Batch 任务没有返回结果文件") client.files.content(batch.output_file_id).write_to_file(output_path)# 记录文件中每一行的起始字节位置def _line_offsets(path: Path) -> list[int]: offsets: list[int] = [] with path.open("rb") as file: while True: # .tell()是获取文件当前指针的位置,readline()后,指针移动到下一行 offset = file.tell() line = file.readline() if not line: break offsets.append(offset) return offsets# 读取下载的 Batch Embedding 结果文件,通过 custom_id 找到原始 Chunk 的位置,再利用文件偏移量读取对应的 Chunk,最终将 Chunk 和 Embedding 向量一一匹配# 这里有人可能问,为什么不直接按行读取,这样是可以的,逻辑更加简单,这里用字节偏移量的方式,主要是为了提高大量 Chunk、Batch 结果乱序时的查找效率def iter_batch_vector_groups( output_path: Path, chunks_path: Path,) -> Iterator[tuple[list[Chunk], list[list[float]]]]: offsets = _line_offsets(chunks_path) seen_starts: set[int] = set() processed = 0 with ( output_path.open(encoding="utf-8") as output_file, chunks_path.open("rb") as chunks_file, ): for line in output_file: # 结果文件每一行就是一个向量化请求结果 result = json.loads(line) if result.get("error") is not None: raise RuntimeError( f"Batch 请求失败:{result['custom_id']}" ) body = result["response"]["body"] rows = sorted( body["data"], key=lambda item: item["index"], ) # 根据custom_id定位 Chunk prefix = "chunk-offset-" custom_id = result["custom_id"] if not custom_id.startswith(prefix): raise RuntimeError(f"无法识别 custom_id:{custom_id}") start = int(custom_id.removeprefix(prefix)) if start in seen_starts: raise RuntimeError(f"Batch 返回重复结果:{custom_id}") if start + len(rows) > len(offsets): raise RuntimeError(f"Batch 返回越界结果:{custom_id}") #seek()指针移动到指定的位置 chunks_file.seek(offsets[start]) current = [ Chunk.model_validate_json(chunks_file.readline()) for _ in rows ] vectors = [row["embedding"] for row in rows] seen_starts.add(start) processed += len(current) yield current, vectors if processed != len(offsets): raise RuntimeError("Batch 返回的向量数量与 Chunk 数量不一致")这里只把每一行 Chunk 的字节位置保存在内存中。即使一个分片包含十万个 Chunk,也不需要同时保存十万个 1024 维向量。
使用版本 Collection 和 Alias
上一节直接把数据写入 document_chunks。现在把它改成固定 Alias,实际数据写入带版本号的 Collection:
document_chunks 固定 Alias,检索代码始终使用它document_chunks_batch_xxx 本次构建的实际 Collectiondocument_chunks_batch_old 上一次构建的实际 Collection,可用于回退修改 vector_store.py,把 Collection 创建逻辑放在 create_chunk_collection() 中,并删除 recreate_chunk_collection() 和 insert_chunks()。Schema 与 HNSW 参数保持不变,Collection 名称使用传入参数:
from pymilvus import DataType# 创建一个新的集合def create_chunk_collection( client: MilvusClient, settings: Settings, collection_name: str,) -> None: schema = MilvusClient.create_schema( auto_id=False, enable_dynamic_field=False, ) schema.add_field( field_name="chunk_id", datatype=DataType.VARCHAR, is_primary=True, max_length=64, ) schema.add_field( field_name="document_id", datatype=DataType.VARCHAR, max_length=64, ) schema.add_field( field_name="source_type", datatype=DataType.VARCHAR, max_length=64, ) schema.add_field( field_name="source_id", datatype=DataType.VARCHAR, max_length=128, ) schema.add_field( field_name="position", datatype=DataType.INT64, ) schema.add_field( field_name="text", datatype=DataType.VARCHAR, max_length=8192, ) # 存储向量,dim 是维度 schema.add_field( field_name="vector", datatype=DataType.FLOAT_VECTOR, dim=settings.embedding_dimensions, ) index_params = client.prepare_index_params() index_params.add_index( field_name="vector", # 使用HNSW索引,这里不过多解释,官方解释已经很清晰( https://milvus.io/docs/hnsw.md ) index_type="HNSW", # metric_type="COSINE" 表示使用余献相似度衡量两个向量相似度 metric_type="COSINE", # M是控制HNSW图构建的邻居连接规模 # efConstruction是HNSW 建立索引时搜索候选邻居的范围 params={"M": 16, "efConstruction": 200}, ) # 创建集合 client.create_collection( collection_name=collection_name, schema=schema, index_params=index_params, # 一致性级别:Bounded 表示有界陈旧一致性,允许一定程度的数据可见性延迟 consistency_level="Bounded", )# 创建或切换别名def activate_chunk_collection( client: MilvusClient, collection_name: str, alias: str,) -> None: # list_aliases() 返回字典,aliases 字段才是别名列表。 aliases = client.list_aliases()["aliases"] if alias in aliases: client.alter_alias( collection_name=collection_name, alias=alias, ) return # 第一次迁移时,上一节创建的是同名实体 Collection。 # 只有新版本已经完整写入并校验后,才删除它并建立 Alias。 if client.has_collection(collection_name=alias): client.drop_collection(collection_name=alias) client.create_alias( collection_name=collection_name, alias=alias, )应用分片时按下面的顺序处理:
1. 创建或继续使用本次运行对应的版本 Collection。 2. 下载已经完成的分片,边读取结果边写入 Milvus。 3. 每完成一个分片,就把 applied状态写回manifest.json。4. 所有分片应用完成后,检查 Collection 的总行数。 5. 只有总数正确,才把 document_chunksAlias 切换到新 Collection。
任何分片失败,都不会切换 Alias。线上检索仍然使用上一个完整版本。
为了让中断后的重复执行不会插入重复主键,在 vector_store.py 中增加 upsert_chunks():
# 更新数据库def upsert_chunks( client: MilvusClient, collection_name: str, chunks: list[Chunk], vectors: list[list[float]],) -> None: rows = [ { "chunk_id": chunk.chunk_id, "document_id": chunk.document_id, "source_type": chunk.source_type, "source_id": chunk.source_id, "position": chunk.position, "text": chunk.text, "vector": vector, } for chunk, vector in zip(chunks, vectors, strict=True) ] client.upsert(collection_name=collection_name, data=rows)Batch 分片统一使用 upsert_chunks() 写入,重复应用分片时不会插入重复主键。
在 batch_indexing.py 中增加应用结果的代码:
from enterprise_rag_cli.infrastructure.batch_embeddings import ( create_batch_client, download_batch_result, get_batch_status, iter_batch_vector_groups,)from enterprise_rag_cli.infrastructure.vector_store import ( activate_chunk_collection, create_chunk_collection, create_milvus_client, upsert_chunks,)@dataclass(frozen=True, slots=True)class AppliedIndex: collection_name: str chunks: int applied_shards: int total_shards: int activated: bool already_active: bool = Falsedef apply_full_index( settings: Settings, run_id: str,) -> AppliedIndex: # 读取 Manifest,获取本次索引任务的信息 manifest = _load_manifest(settings, run_id) run_dir = _manifest_path(settings, run_id).parent collection_name = manifest["collection_name"] shards = manifest["shards"] batch_client = create_batch_client(settings) milvus = create_milvus_client(settings) try: # 检查目标 Collection 是否已经激活 alias_info = None aliases = milvus.list_aliases()["aliases"] if settings.milvus_collection in aliases: alias_info = milvus.describe_alias( alias=settings.milvus_collection, ) # Alias:Collection 的别名,可以指向不同的 Collection # 这里判断如果当前别名指向的 Collection 已经是 Manifest 的集合了,那说明它已经是当前正式使用的索引了 if ( alias_info is not None and alias_info["collection_name"] == collection_name ): return AppliedIndex( collection_name=collection_name, chunks=manifest["chunks"], applied_shards=len(shards), total_shards=len(shards), activated=True, already_active=True, ) # Collection不存在,创建 Collection if not milvus.has_collection(collection_name=collection_name): create_chunk_collection( client=milvus, settings=settings, collection_name=collection_name, ) # Collection 被重新创建时,所有分片是否应用的状态改成 False。 for shard in shards: shard["applied"] = False _save_manifest(settings, run_id, manifest) for shard in shards: # 跳过已经写过的分片 if shard["applied"]: continue batch_id = shard["batch_id"] if batch_id is None: continue # 跳过没有完成的分片 status = get_batch_status(batch_client, batch_id) shard["status"] = status if status != "completed": continue # 查看下载的结果文件,如果没有下载,就下载 shard_dir = run_dir / "shards" / shard["shard_id"] output_path = shard_dir / f"output-{batch_id}.jsonl" if not output_path.exists(): download_batch_result( batch_client, batch_id, output_path, ) # 循环Chunks 和向量结果,依次更新到 Milvus 数据库中 pending_chunks: list[Chunk] = [] pending_vectors: list[list[float]] = [] for current_chunks, current_vectors in ( iter_batch_vector_groups( output_path=output_path, chunks_path=shard_dir / "chunks.jsonl", ) ): if any( len(vector) != settings.embedding_dimensions for vector in current_vectors ): raise RuntimeError("Batch 返回的向量维度不正确") pending_chunks.extend(current_chunks) pending_vectors.extend(current_vectors) # 达到写入的批次大小,执行 Upsert while ( len(pending_chunks) >= settings.milvus_write_batch_size ): size = settings.milvus_write_batch_size upsert_chunks( client=milvus, collection_name=collection_name, chunks=pending_chunks[:size], vectors=pending_vectors[:size], ) del pending_chunks[:size] del pending_vectors[:size] if pending_chunks: upsert_chunks( client=milvus, collection_name=collection_name, chunks=pending_chunks, vectors=pending_vectors, ) # 写入Milvus 后,记录 applied 为 True shard["applied"] = True _save_manifest(settings, run_id, manifest) # 统计应用的个数 applied_shards = sum( 1 for shard in shards if shard["applied"] ) _save_manifest(settings, run_id, manifest) # 没有全部完成 if applied_shards != len(shards): return AppliedIndex( collection_name=collection_name, chunks=manifest["chunks"], applied_shards=applied_shards, total_shards=len(shards), activated=False, ) # 全部完成后,Milvus 将当前 Collection 的缓冲数据持久化 milvus.flush(collection_name=collection_name) stats = milvus.get_collection_stats( collection_name=collection_name, ) # 校验Milvus中的数据量 if int(stats["row_count"]) != manifest["chunks"]: raise RuntimeError("Milvus 写入数量与 Chunk 数量不一致") # 使用新Collection activate_chunk_collection( client=milvus, collection_name=collection_name, alias=settings.milvus_collection, ) return AppliedIndex( collection_name=collection_name, chunks=manifest["chunks"], applied_shards=applied_shards, total_shards=len(shards), activated=True, ) finally: milvus.close()batch-apply 可以重复执行。已经应用的分片会被跳过;上一次在写入中途退出的分片会通过 upsert 安全地重新执行。当前可用索引不会被提前删除。
替换同步构建命令
删除 src/enterprise_rag_cli/application/indexing.py,并将 src/enterprise_rag_cli/commands/index.py 替换为以下内容:
from __future__ import annotationsimport typerfrom rich.table import Tablefrom enterprise_rag_cli.application.batch_indexing import ( apply_full_index, prepare_full_index, refresh_batch_status, submit_batch_shards,)from enterprise_rag_cli.config import get_settingsfrom enterprise_rag_cli.infrastructure.database import create_session_factoryfrom enterprise_rag_cli.presentation import consoleapp = typer.Typer(no_args_is_help=True)@app.command("batch-prepare")def batch_prepare() -> None: """分页读取完整文档库并生成 Batch 分片。""" settings = get_settings() session_factory = create_session_factory(settings) with console.status("正在切分文档并生成 Batch 分片…"): with session_factory() as session: run = prepare_full_index(session, settings) console.print(f"Run ID:{run.run_id}") console.print(f"文档:{run.documents}") console.print(f"Chunk:{run.chunks}") console.print(f"分片:{run.shards}") console.print(f"本地任务目录:{run.run_dir}")@app.command("batch-submit")def batch_submit(run_id: str) -> None: """提交尚未完成的 Batch 分片。""" submitted = submit_batch_shards(get_settings(), run_id) console.print(f"本次提交分片:{submitted}")@app.command("batch-status")def batch_status(run_id: str) -> None: """汇总所有 Batch 分片的状态。""" counts = refresh_batch_status(get_settings(), run_id) table = Table(title=f"全量索引任务 {run_id}") table.add_column("状态") table.add_column("分片", justify="right") for status, count in sorted(counts.items()): table.add_row(status, str(count)) console.print(table)@app.command("batch-apply")def batch_apply(run_id: str) -> None: """应用已完成分片,并在全部完成后切换 Alias。""" with console.status("正在应用已经完成的向量分片…"): result = apply_full_index(get_settings(), run_id) console.print( f"已应用分片:{result.applied_shards}/{result.total_shards}" ) console.print(f"Collection:{result.collection_name}") if result.already_active: console.print("这个索引版本已经启用。") elif result.activated: console.print("全部分片校验通过,完整索引已经启用。") else: console.print("仍有分片未完成,当前 Alias 保持不变。")现在可以依次执行:
# 分页读取文档,生成多个本地请求分片uv run rag index batch-prepare# 使用上一步输出的 run_id 提交所有分片uv run rag index batch-submit <run_id># 随时汇总各个分片的Embedding状态uv run rag index batch-status <run_id># 下载完成 Embedding 的分片任务,并且应用已经完成的分片;可重复执行uv run rag index batch-apply <run_id>如果状态表中出现 failed、expired 或 cancelled,再次执行 batch-submit <run_id>,程序只会重新提交失败的分片。
所有分片完成并应用后,在 Attu 中可以看到带运行版本号的新 Collection。检索代码仍然访问 document_chunks,但这个名称现在是 Alias,所以后续检索接口不用改。
为什么不直接自动删除旧版本
新索引刚切换时还没有经过检索验证。保留上一个 Collection,可以在发现异常后立即把 Alias 切回去。确认新版本正常后,再手动删除不再需要的旧版本。
总结
这章的主要难点在于,如何把下载结果(output-batch.json)和 Chunk(chunks.jsonl)一一对应上,如果还是无法理解的,可以先实现完成,然后执行上面四个命令,看看项目中生成的jsonl 文件,最后结合下图慢慢理解。
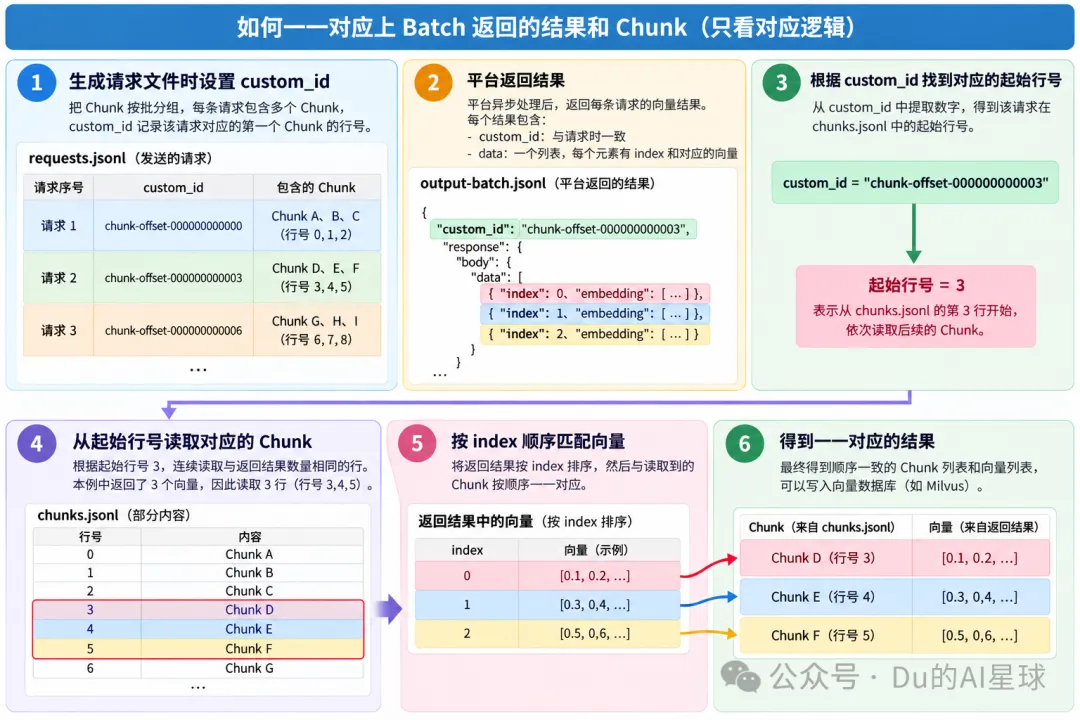
这里可能有人有疑问,我既然获取了起始行号,为什么不能直接按行来读取chunks.jsonl文件,这样不是更容易一一对应上了。起始当前可以按行读取,而且逻辑会更加简单。这里使用字节偏移量的方式,主要是为了提高大量 Chunk、Batch 结果乱序时的查找效率。
相关链接
• 百炼批量推理:https://help.aliyun.com/zh/model-studio/batch-inference • OpenAI 兼容 Embedding:https://help.aliyun.com/zh/model-studio/embedding-interfaces-compatible-with-openai/ • Milvus Alias:https://milvus.io/docs/manage-aliases.md • 本节源码:https://github.com/agua-du/enterprise-rag-cli