 夜雨聆风
夜雨聆风


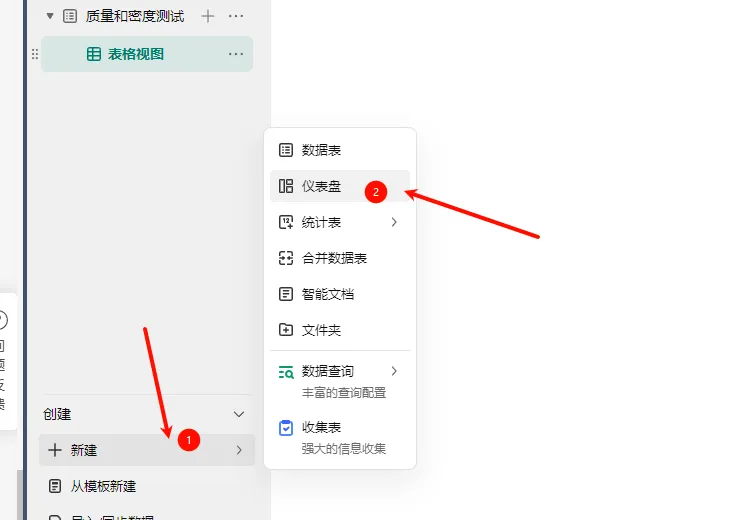
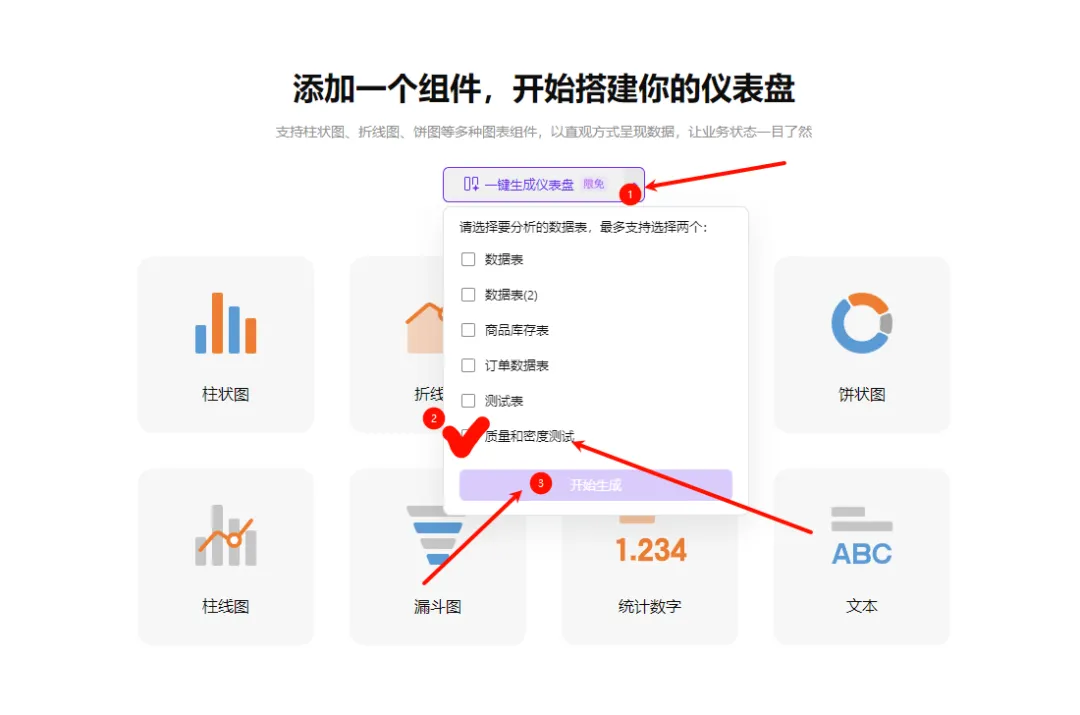
用 WPS 多维表格收集学生做题数据,完整教程(附代码)


-
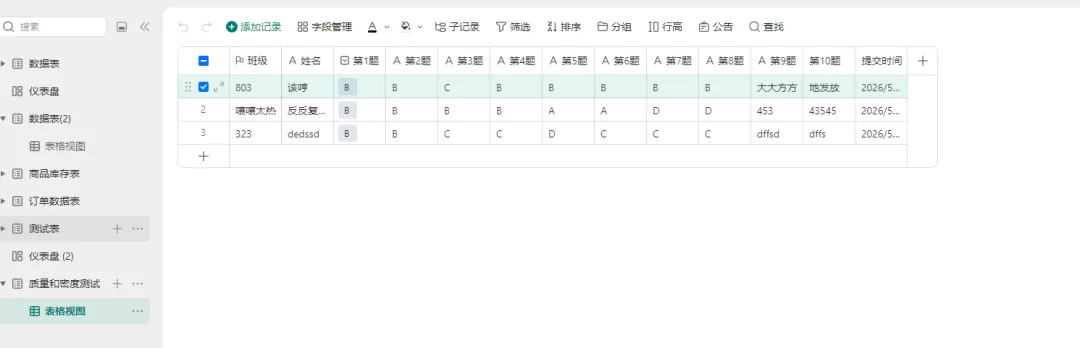
课堂上学生做完习题,答案自动汇总到表格,课后直接分析错题分布
-
发一份在线调查问卷,回收的数据实时进入 WPS,随时查看统计
-
收集学生报名信息、作业提交记录,统一管理


|
|
|
|
|---|---|---|
|
|
|
|
|
|
|
|
|
|
|
|
|
|
|
|


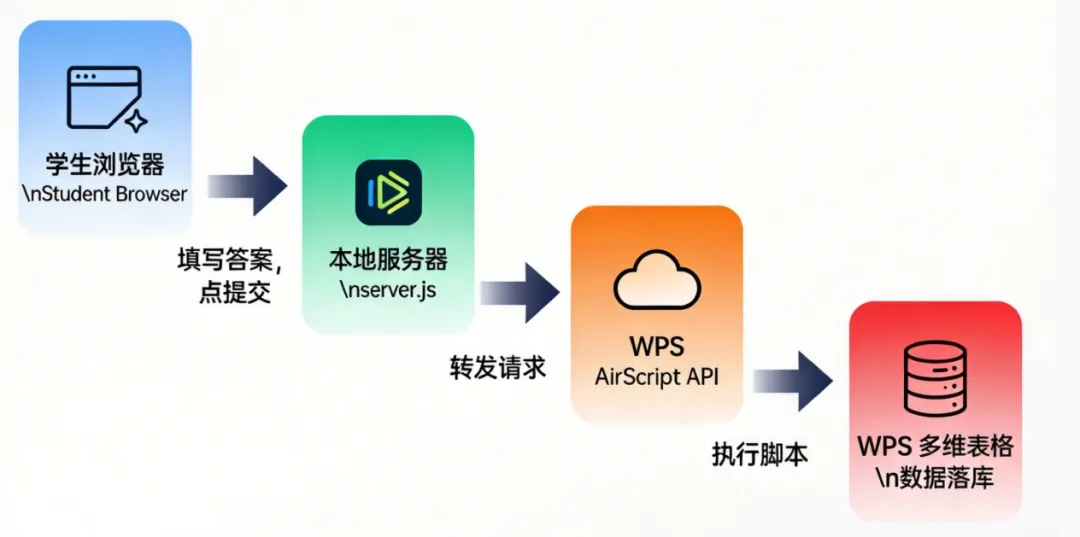
学生浏览器
↓ 填写答案,点提交
本地服务器 (server.js)
↓ 转发请求
WPS AirScript API
↓ 执行脚本
WPS 多维表格 ← 数据落库

-
/*** 字段值类型自动转换*/functionconvertFieldValue(value, fieldType) {if (value === null || value === undefined || value === "") returnnull;switch (fieldType) {case'Number':case'Currency':case'Percentage':constnum = Number(value);returnisNaN(num) ? null : num;case'Date':case'CreatedTime':case'LastModifiedTime':try {constdate = newDate(value);returnisNaN(date.getTime()) ? null : date.toLocaleDateString('zh-CN');} catch (e) { returnnull; }case'Time':returnString(value);case'Checkbox':case'Complete':returnBoolean(value);case'SingleSelect':returnString(value);case'MultipleSelect':if (Array.isArray(value)) {return value.map(item => String(item));}return [String(value)];case'Phone':case'Email':case'Url':case'MultiLineText':case'Note':case'ID':returnString(value);default:return value;}}/*** 按表名判断:存在则追加数据,不存在则新建表* @param {Object} input 输入参数* @param {string} input.sheetName 目标表名称(必填)* @param {Array} [input.fields] 表字段定义(新建表时必填)* @param {Array} input.records 要写入的记录数据(必填)* @param {Object} [input.fieldMap] 字段映射* @param {Boolean} [input.autoConvertType=true] 是否自动转换字段类型* @return {Object} 执行结果*/functionwriteOrCreateSheet(input) {if (!input.sheetName || !input.records || !Array.isArray(input.records)) {return { success: false, message: "参数错误:sheetName 和 records 为必填项" };}constfieldMap = input.fieldMap || {};constautoConvertType = input.autoConvertType !== false;try {constallSheets = Application.Sheet.GetSheets();let targetSheet = null;for (let i = 0; i < allSheets.length; i++) {if (allSheets[i].name === input.sheetName) {targetSheet = allSheets[i];break;}}if (targetSheet) {// 表已存在:追加数据constsheetId = targetSheet.id;constexistingFields = Application.Field.GetFields({ SheetId: sheetId });constfieldTypeMap = {};for (let i = 0; i < existingFields.length; i++) {fieldTypeMap[existingFields[i].name] = existingFields[i].type;}constexistingFieldNames = Object.keys(fieldTypeMap);constprocessedRecords = [];for (let i = 0; i < input.records.length; i++) {constrecord = input.records[i];constprocessedFields = {};constfieldKeys = Object.keys(record.fields);for (let j = 0; j < fieldKeys.length; j++) {constinputKey = fieldKeys[j];constvalue = record.fields[inputKey];constactualKey = fieldMap[inputKey] || inputKey;if (existingFieldNames.includes(actualKey)) {processedFields[actualKey] = autoConvertType? convertFieldValue(value, fieldTypeMap[actualKey]): value;}}processedRecords.push({ fields: processedFields });}constresult = Application.Record.CreateRecords({SheetId: sheetId,Records: processedRecords});return {success: true,operation: "追加数据",message: "成功向表「" + input.sheetName + "」追加" + result.length + "条数据",data: { sheetId, sheetName: input.sheetName, records: result }};} else {// 表不存在:创建新表if (!input.fields || !Array.isArray(input.fields)) {return { success: false, message: "参数错误:表不存在时 fields 为必填项" };}constnewSheet = Application.Sheet.CreateSheet({Name: input.sheetName,Views: [{ name: '表格视图', type: 'Grid' }],Fields: input.fields});constresult = Application.Record.CreateRecords({SheetId: newSheet.id,Records: input.records});return {success: true,operation: "创建新表",message: "成功创建表「" + input.sheetName + "」并写入" + result.length + "条数据",data: { sheetId: newSheet.id, sheetName: input.sheetName, records: result }};}} catch (error) {return {success: false,message: "执行错误:" + error.message,error: error.stack};}}// ========== 主入口 ==========try {constinputParams = Context.argv;constexecutionResult = writeOrCreateSheet(inputParams);console.log("执行结果:", JSON.stringify(executionResult, null, 2));executionResult;} catch (globalError) {console.error("脚本全局错误:", globalError);throw globalError;}}
https://www.kdocs.cn/api/v3/ide/file/517338409857/script/V2-3XvxSAmmiMDu2igftMjoXY/sync_task
-
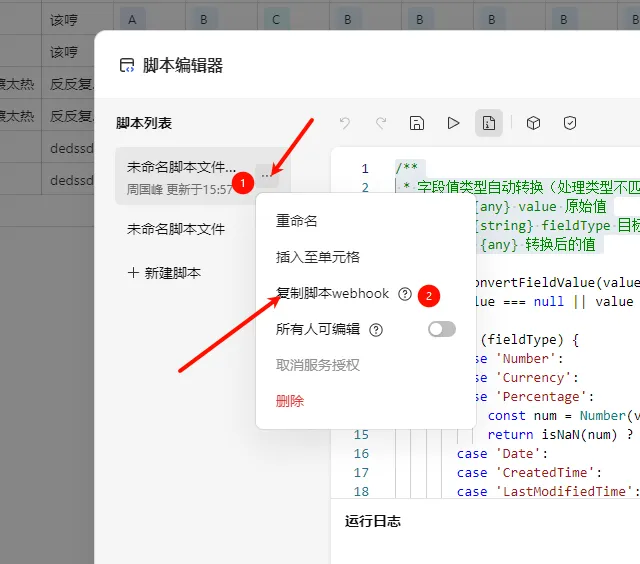
File ID:在你的 WPS 文件 URL 中能找到。那 File ID 就是 `517338409857`。也可以在 AirScript 编辑器中查看。
-
Script ID:在 AirScript 编辑器中,点击脚本名称旁边的设置图标可以看到”V2-3XvxSAmmiMDu2igftMjoXY“。
-
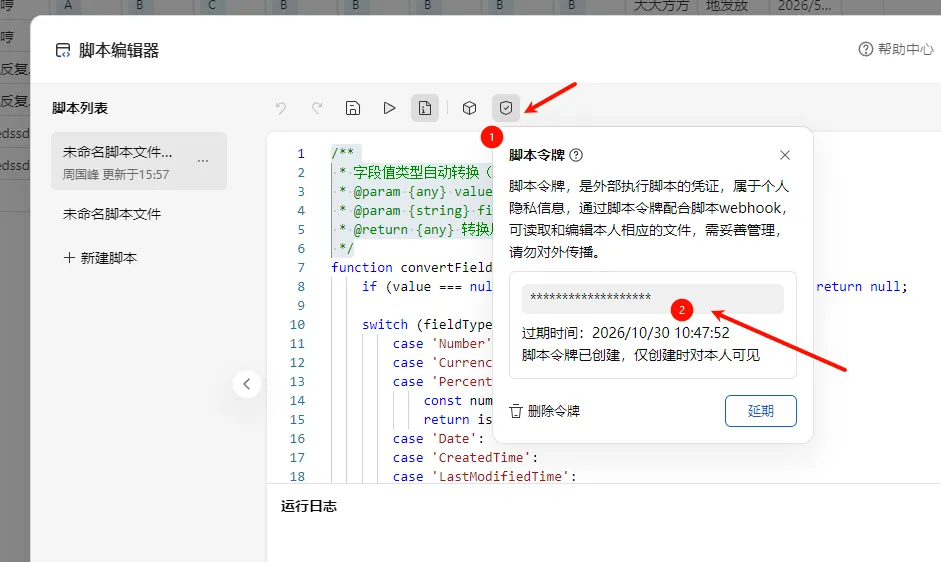
API Token:在 AirScript 编辑器中,点击「发布」→「API 调用」,会生成一个令牌。 -


//这个文件可以发给AI,然后让ai生成你所需要的。const http = require('http');const https = require('https');const fs = require('fs');const path = require('path');// ========================================// 配置区(只需修改这里)// ========================================const WPS_CONFIG = {fileId: '你的File ID', // ← 替换scriptId: '你的Script ID', // ← 替换apiToken: '你的API Token', // ← 替换baseUrl: 'https://www.kdocs.cn/api/v3'};const PORT = 3000;const HTML_FILE = path.join(__dirname, 'index.html');// ========================================// 服务器代码(不用改)// ========================================const server = http.createServer((req, res) => {res.setHeader('Access-Control-Allow-Origin', '*');res.setHeader('Access-Control-Allow-Methods', 'GET, POST, OPTIONS');res.setHeader('Access-Control-Allow-Headers', 'Content-Type');if (req.method === 'OPTIONS') {res.writeHead(204);res.end();return;}// 提供网页if (req.method === 'GET' && (req.url === '/' || req.url === '/index.html')) {fs.readFile(HTML_FILE, 'utf-8', (err, content) => {if (err) {res.writeHead(500);res.end('HTML 文件未找到,请确保 index.html 与 server.js 在同一目录');return;}res.writeHead(200, { 'Content-Type': 'text/html; charset=utf-8' });res.end(content);});return;}// 代理 API 请求if (req.method === 'POST' && req.url === '/api/submit') {let body = '';req.on('data', chunk => { body += chunk; });req.on('end', () => {try {const data = JSON.parse(body);console.log('收到提交:', data.className, '-', data.studentName);const wpsUrl = WPS_CONFIG.baseUrl+ '/ide/file/' + WPS_CONFIG.fileId+ '/script/' + WPS_CONFIG.scriptId+ '/sync_task';const wpsPayload = {Context: {argv: {sheetName: data.sheetName || '数据收集',records: [{fields: data.record}],fields: data.fields || null}}};const postData = JSON.stringify(wpsPayload);const urlObj = new URL(wpsUrl);const wpsReq = https.request({hostname: urlObj.hostname,port: 443,path: urlObj.pathname,method: 'POST',headers: {'Content-Type': 'application/json','AirScript-Token': WPS_CONFIG.apiToken,'Content-Length': Buffer.byteLength(postData)}}, (wpsRes) => {let wpsBody = '';wpsRes.on('data', chunk => { wpsBody += chunk; });wpsRes.on('end', () => {console.log('WPS 响应:', wpsRes.statusCode, wpsBody);res.writeHead(wpsRes.statusCode, { 'Content-Type': 'application/json' });res.end(wpsBody);});});wpsReq.on('error', (err) => {console.error('请求失败:', err.message);res.writeHead(500, { 'Content-Type': 'application/json' });res.end(JSON.stringify({ error: err.message }));});wpsReq.write(postData);wpsReq.end();} catch (err) {res.writeHead(400, { 'Content-Type': 'application/json' });res.end(JSON.stringify({ error: '请求数据格式错误' }));}});return;}res.writeHead(404);res.end('Not Found');});server.listen(PORT, () => {console.log('');console.log(' 服务已启动!');console.log(' 打开浏览器访问: http://localhost:' + PORT);console.log(' 按 Ctrl+C 停止');console.log('');});


<!DOCTYPE html><htmllang="zh-CN"><head><metacharset="UTF-8"><metaname="viewport"content="width=device-width, initial-scale=1.0"><title>在线习题测试</title><p>正在提交...</p></div></div><script>// ========================================// 提交数据到本地服务器(服务器再转发到 WPS)// ========================================function submitToBackend(data) {return new Promise(function(resolve, reject) {var xhr = new XMLHttpRequest();xhr.addEventListener('readystatechange', function() {if (this.readyState === this.DONE) {if (this.status >= 200 && this.status < 300) {try { resolve(JSON.parse(this.responseText)); }catch(e) { resolve(this.responseText); }} else {reject(new Error('HTTP ' + this.status));}}});xhr.open('POST', '/api/submit');xhr.setRequestHeader('Content-Type', 'application/json');xhr.send(JSON.stringify(data));});}// ========================================// 收集表单数据// ========================================function collectFormData() {var className = document.getElementById('className').value.trim();var studentName = document.getElementById('studentName').value.trim();if (!className || !studentName) {showToast('请填写班级和姓名', 'warning');return null;}var answers = {};for (var i = 1; i <= 8; i++) {var sel = document.querySelector('input[name="q' + i + '"]:checked');answers['q' + i] = sel ? sel.value : '未作答';}answers['q9'] = document.getElementById('q9').value.trim() || '未作答';answers['q10'] = document.getElementById('q10').value.trim() || '未作答';return { className: className, studentName: studentName, answers: answers };}// ========================================// 提交(带防重复提交锁)// ========================================var isSubmitting = false;async function handleSubmit() {if (isSubmitting) return;isSubmitting = true;var data = collectFormData();if (!data) { isSubmitting = false; return; }var unanswered = Object.values(data.answers).filter(function(a) { return a === '未作答'; }).length;if (unanswered > 0) {if (!confirm('你还有 ' + unanswered + ' 道题未作答,确定要提交吗?')) {isSubmitting = false; return;}}var btn = document.getElementById('submitBtn');btn.disabled = true;document.getElementById('loading').classList.add('show');// 构造发给后端的数据(后端会转换为 WPS 要求的格式)var payload = {sheetName: '质量和密度测试',record: {'班级': data.className,'姓名': data.studentName,'第1题': data.answers.q1,'第2题': data.answers.q2,'第3题': data.answers.q3,'第4题': data.answers.q4,'第5题': data.answers.q5,'第6题': data.answers.q6,'第7题': data.answers.q7,'第8题': data.answers.q8,'第9题': data.answers.q9,'第10题': data.answers.q10,'提交时间': new Date().toLocaleString('zh-CN')},fields: [{ name: '班级', type: 'MultiLineText' },{ name: '姓名', type: 'MultiLineText' },{ name: '第1题', type: 'MultiLineText' },{ name: '第2题', type: 'MultiLineText' },{ name: '第3题', type: 'MultiLineText' },{ name: '第4题', type: 'MultiLineText' },{ name: '第5题', type: 'MultiLineText' },{ name: '第6题', type: 'MultiLineText' },{ name: '第7题', type: 'MultiLineText' },{ name: '第8题', type: 'MultiLineText' },{ name: '第9题', type: 'MultiLineText' },{ name: '第10题', type: 'MultiLineText' },{ name: '提交时间', type: 'MultiLineText' }]};try {var result = await submitToBackend(payload);console.log('提交结果:', result);showToast('✅ 提交成功!', 'success');btn.textContent = '✅ 已提交';} catch (error) {console.error('提交失败:', error);showToast('❌ 提交失败:' + error.message, 'error');btn.disabled = false;isSubmitting = false;} finally {document.getElementById('loading').classList.remove('show');}}function showToast(message, type) {var toast = document.getElementById('toast');toast.textContent = message;toast.className = 'toast ' + type + ' show';setTimeout(function() { toast.classList.remove('show'); }, 3000);}</script></body></html>


data-collector/
├── server.js      ← 后端(改好配置)
└── index.html     ← 前端(改好题目)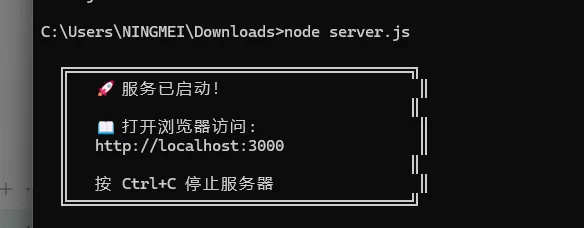
cd data-collector
node server.js


-
题目内容:把 `<div class=”question”>` 里的文字换成你的题目 -
字段定义:把 `payload.fields` 和 `payload.record` 里的字段名换成你需要的

